How to Add Schema Markup for WordPress the Easy Way

Do you want to add Schema markup for WordPress blogs to have an edge over your competitors? Let’s begin.
Schema markup is an important element of search engine optimization (SEO) that can help to improve the visibility and ranking of WordPress blogs in search results.
In this article, we’ll take a closer look at what schema markup is, how it works, and why it’s important for WP blogs.
Table of Content:
1. What is Schema Markup?
2. How does Schema Markup Work?
3. Formats Of Scheme Vocabulary
4. Why is Schema Markup important for blogs?
5. Most Used Markup Schemas
6. How to add Schema Mark up to your wp site?
  6.1 Add schema markup manually without using plugins
    6.1.1 Create schema markup in Gutenberg
    6.1.2 Set schema markup in classic
          editor.
    6.1.3 Pros of creating schema without plugin.
  6.2 Add schema markup using plugins.
5. Conclusion
What is Schema Markup?
Schema markup is a type of structured data that helps search engines understand the content of a website more effectively.
It provides additional context to search engines about the content of a page, including the type of content, its purpose, and other relevant information.
Schema markup uses a standardized vocabulary of tags or “schemas” to label different types of content on a website, such as articles, events, products, and more. This allows search engines to interpret the content more accurately and display it more effectively in search results.
How Does Schema Markup Work?
When a search engine crawls a website, it looks for structured data that helps it understand the content and context of the page.
If schema markup is present on a page, the search engine will use it to better understand the content and display it more effectively in search results.
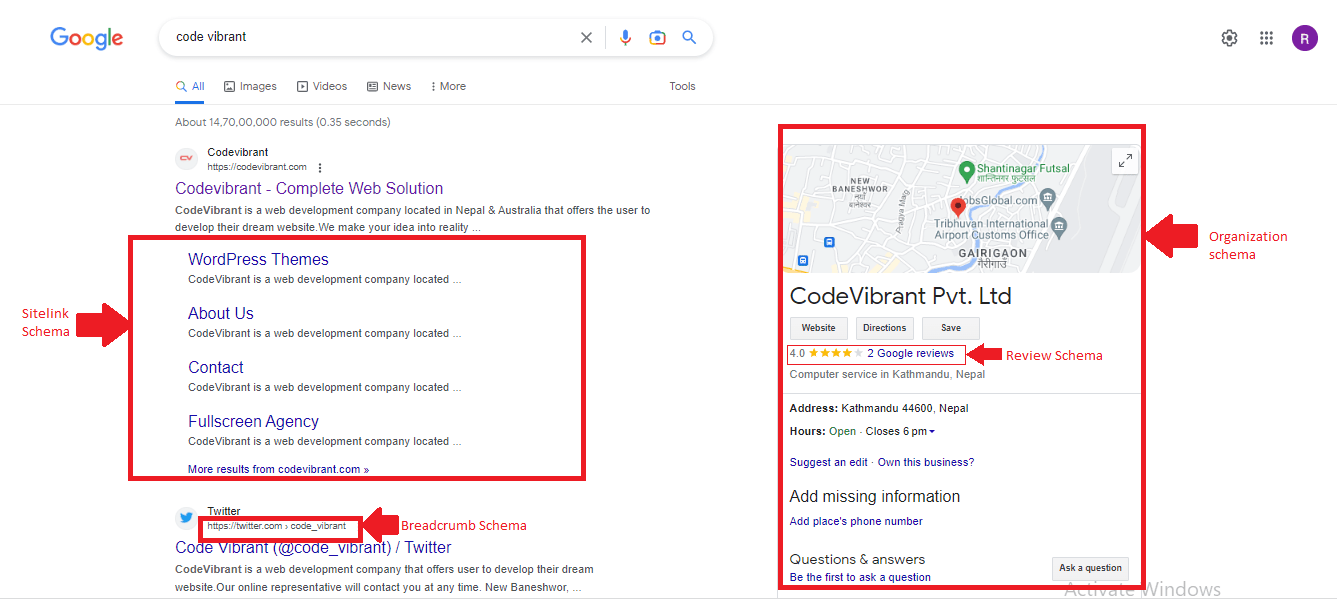
For example, if a WordPress blog post includes schema markup that identifies it as an “Review,” search engines will be able to display additional information about the review in search results, such as rating ,reviewer , total votes an so on.
. This can make the search result more attractive to users and increase the likelihood that they will click through to the page.
Formats of Schema Vocabulary:
JSON-LD, Microdata, and RDFa are three different markup formats used to provide structured data to search engines, allowing them to better understand the content and context of web pages.
JSON-LD (JavaScript Object Notation for Linked Data) is a lightweight linked data-interchange format that can be used to embed structured data into web pages. JSON-LD is a preferred markup format by Google, and it is recommended for most websites
Microdata is another markup format that allows webmasters to embed structured data directly into HTML markup. Microdata uses HTML5 tags to describe the content and context of the data on a web page.
RDFa (Resource Description Framework in Attributes) is a markup format that embeds structured data within HTML tags using a set of attributes. RDFa uses semantic web technologies to create machine-readable data that can be easily understood by search engines.
All three markup formats serve the same purpose of providing structured data to search engines, but they use different syntax and techniques to achieve this goal
JSON-LD is considered the easiest to use and implement, as it allows the structured data to be placed outside of the HTML document, while Microdata and RDFa require the structured data to be placed within the HTML document.
Ultimately, the choice of which markup format to use depends on the specific needs of your website and your technical expertise.

Why is Schema Markup Important for WP Blogs?
There are several reasons why schema markup is important for WordPress blogs, including:
- Improved visibility in search results: By adding schema markup to your WP blog, you can improve the chances of your content appearing prominently in search results, making it more visible to potential readers.
- Enhanced user experience: Schema markup can make your WP blog’s content more attractive and informative in search results, which can help to increase click-through rates and improve the user experience.
- Better search engine understanding: Schema markup helps search engines understand the content and context of your WP blog’s pages more effectively, which can improve the accuracy and relevance of search results.
- Competitive advantage: Not all WP blogs implement schema markup, which means that by using it on your site, you can gain a competitive edge in search results and garner more traffic to your site.
MOST USED MARKUP SCHEMAS
- How-To Markup
- Product Markup
- Reviews Markup
- Software Markup
- FAQs Markup
- Sitelink Markup
How to add Schema Markup for WordPress blogs without Plugins?
To add schema markup to your WordPress blog without using a plugin in Gutenberg editor, you can follow these steps:
First select a post or a page, where you want to add a schema. Here, we shall add a schema to a post. To do that, navigate to Posts >> All Posts. Then, hover over the post and click on Edit just below the post’s title.

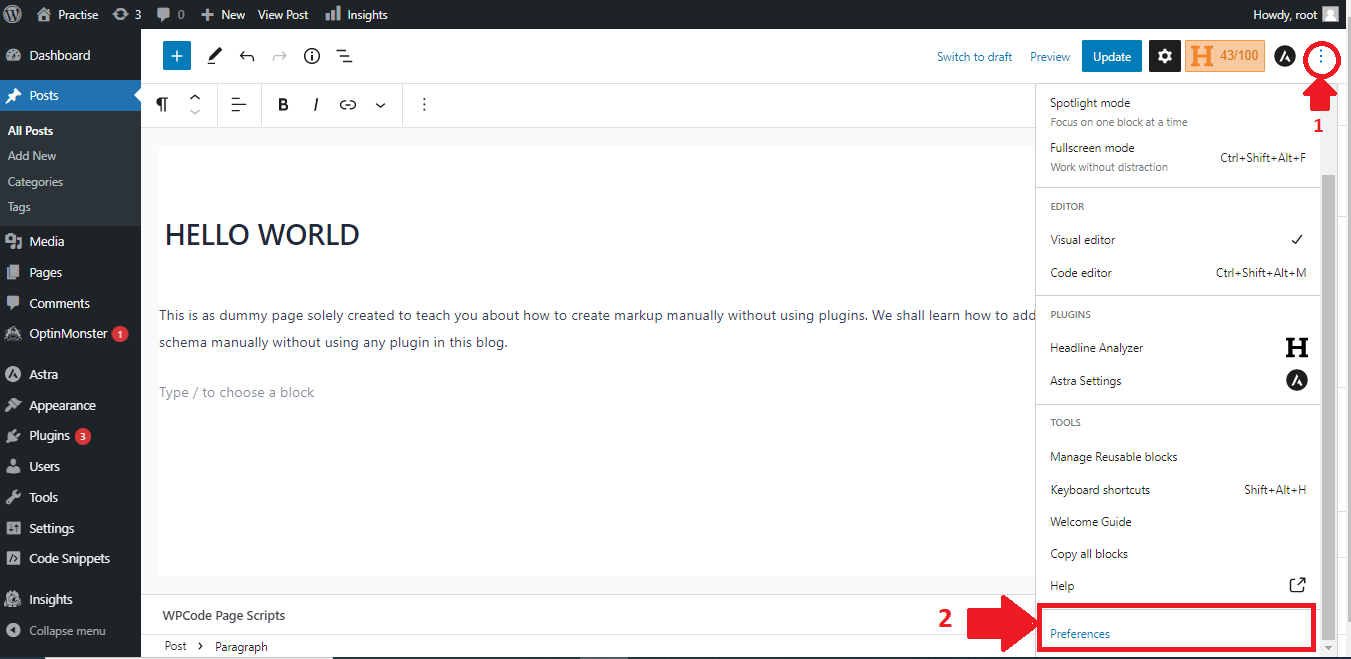
You will be directed to the text editor. Click on the vertical ellipses ( ⋮ ) at the top right corner. Then, scroll down and click on the Preferences menu.
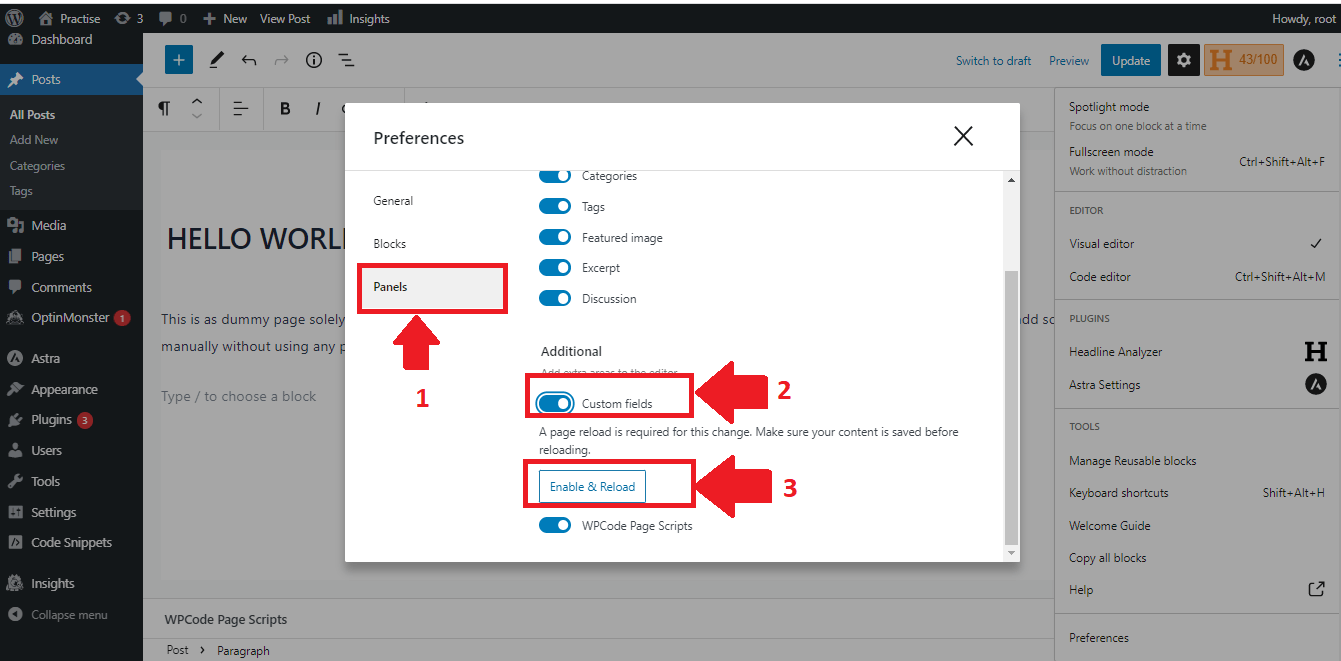
Then, click on the Panels tab. Scroll down to the “Additional” section and toggle on the Custom Fields. After that, click on the “ Enable and Reload “ button just below it.
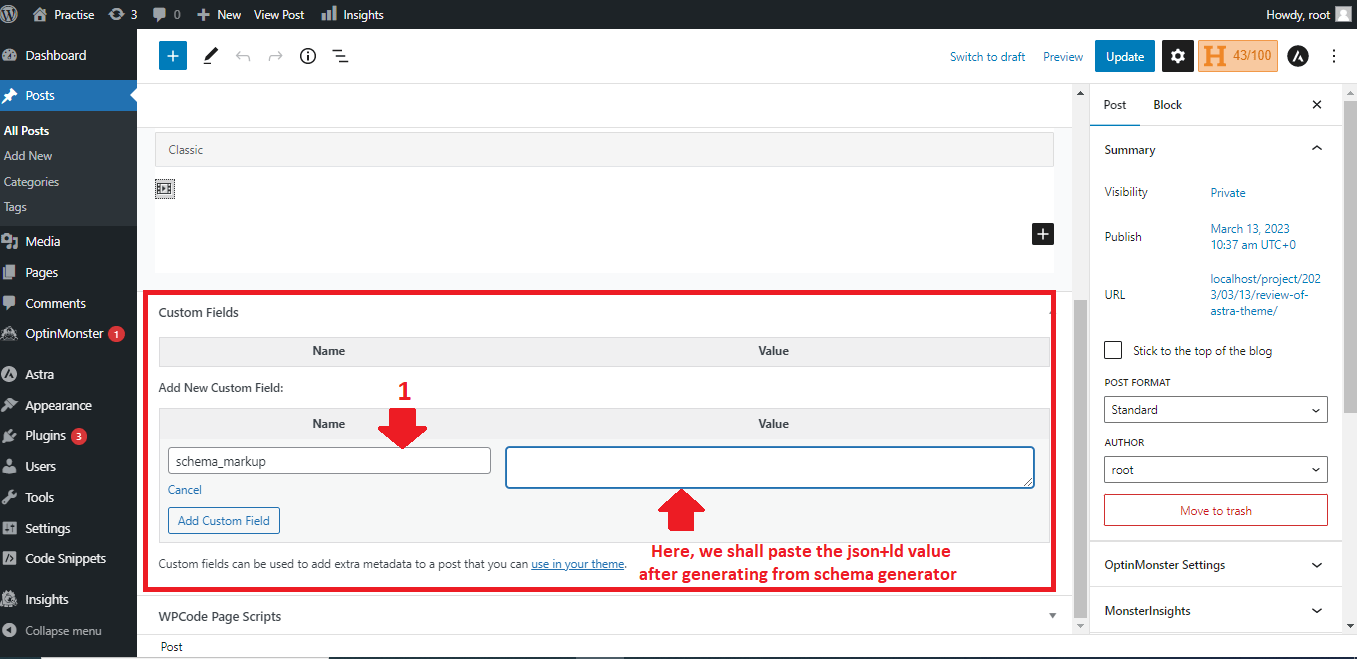
After you reload, you can see the Name Value pair under the Custom Fields section. You can then add one or more schemas of your choice under that section. Let’s name our schema, “schema_markup”. Although, you can name anything, I suggest you name the same.
Then, decide which schema type you want to add to your website. You can choose from various schema types like Article, BlogPosting, Event, Product, etc. You can check the schema.org website for a complete list of schema types.
For the unversed, who aren’t used to coding, you can create custom schemas from free schema generators like RankRager or TechnicalSEO. Lets create an article schema for our wordpress post using RankRager here.


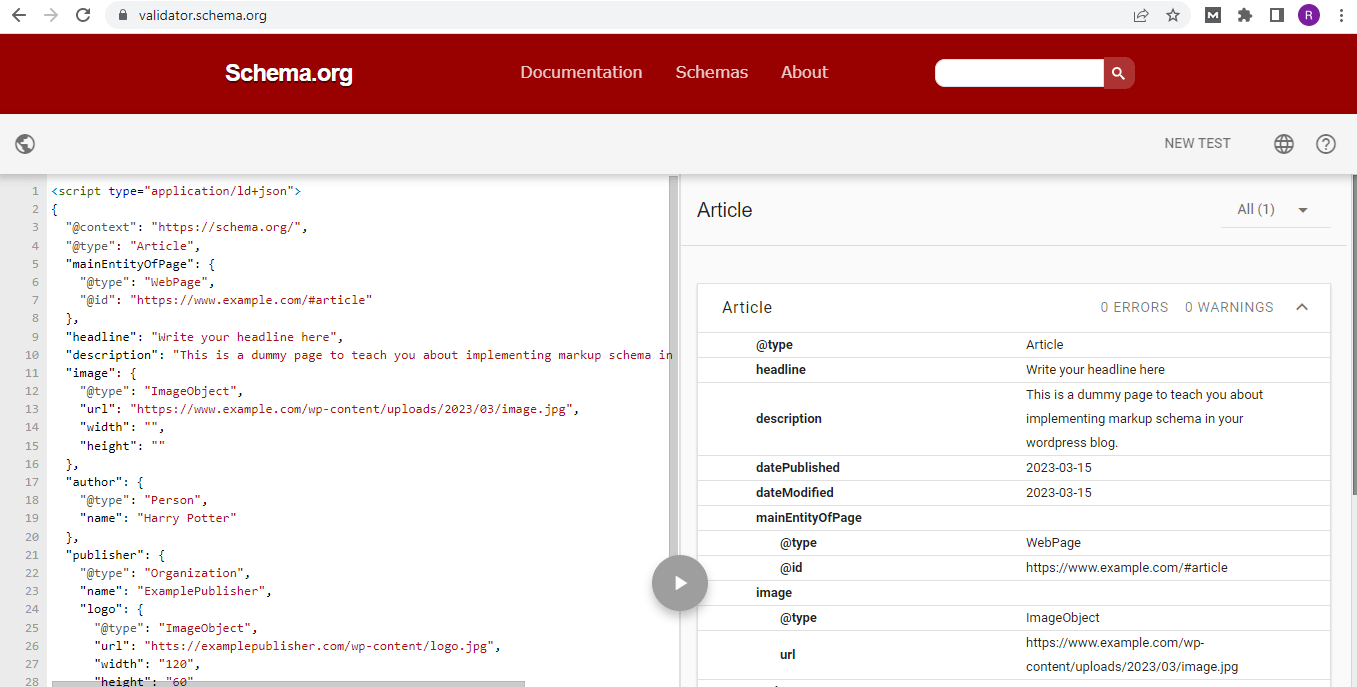
Validate the generated schema by clicking on the validate button. You can perform both Rich Snippet test and Schema Markup Validator
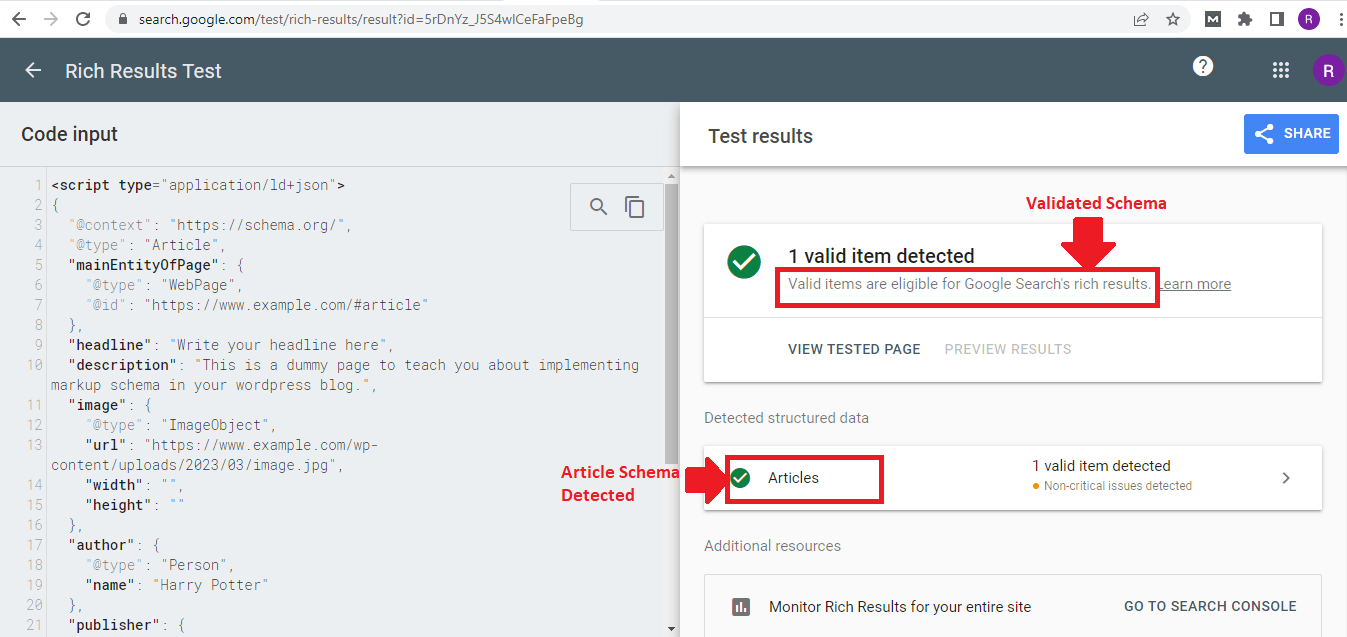
Rich Result Test
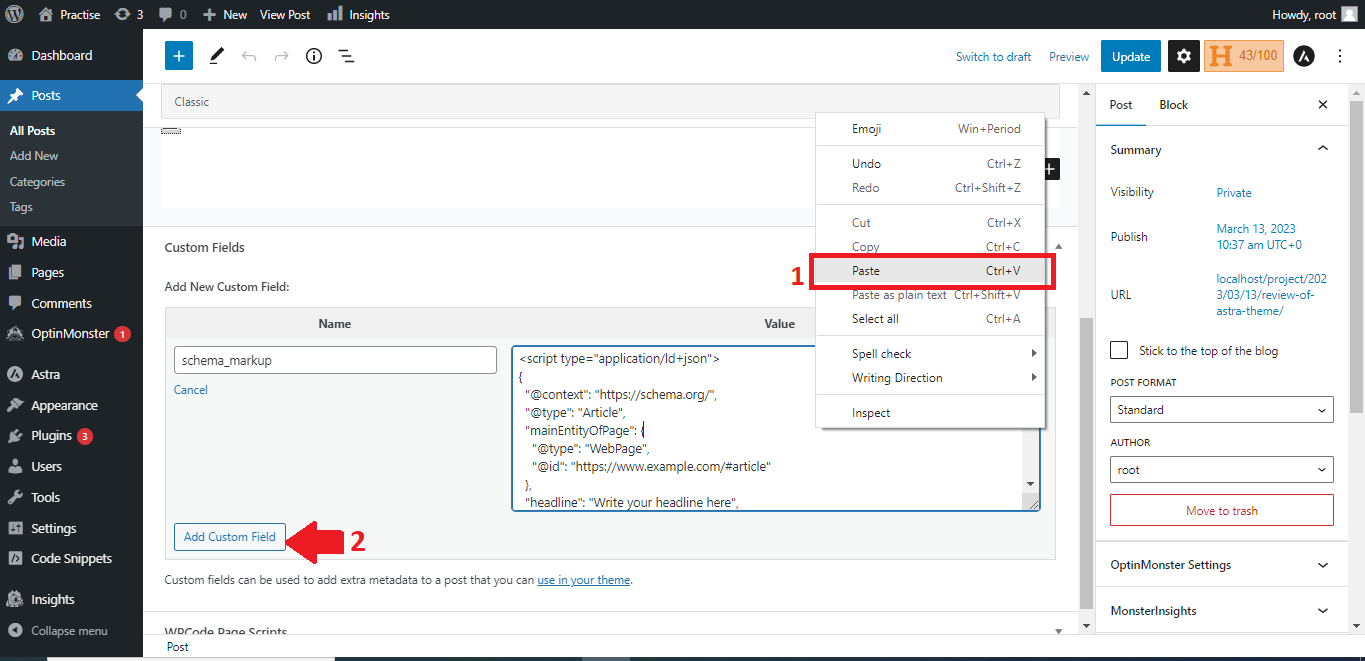
After validating the schema, copy the JSON-LD code from RankPage to your desired post under the Custom Field Section. Click on the “Add Custom Field” button after pasting the JSON code.
Edit Header.php file
Navigate to Appearance >> Theme File Editor. Then, open the header.php file of your wordpress theme. Paste the code given below just before the head closing tag </head> .
<?php
$schema = get_post_meta(get_the_ID(),'schema_markup',true);
if (!empty ( $schema)){
echo $schema;
}
?>
Save the changes to your header.php file and refresh your website to see the changes.
Note: Before making any changes to your theme files, it’s always a good idea to make a backup of your website. Or you can a create child theme so that you won’t lose any edits during the theme updates.
Set markup schema manually in Old Classic Editor
Click on Posts >> All Posts. Hover the posts, where you want to add schema manually. Click on the Edit option just below the title.
At the top right corner of the classic editor, click on the Screen Options. Check on the “Custom Fields” box.
Scroll down the Post textbox. Copy and paste generated schema from “free schema generators” like Rank Page. Then update the custom fields.
Finally, for the custom schema to work, update header.php file just like the same way used before.
Note: The name of Custom Field here is “schema_markup” because we have used the same name in our header.php code. You can name anything but you have to update the header.php accordingly.

Set Multiple Markup Schemas For a Single Post
Incase you want to add multiple markup schemas manually for one of your post. You just have to generate any JSON/LD schema of your choice from free markup schema generators as mentioned above.
Then, you can copy and paste the multiple JSON/LD schemas generated from the third party website like RankRager into your Custom Fields section.
For instance, if you want to set “Article” schema and “FAQ” schema to your single post. You can generate them and paste them as Values of Custom Fields section.

After you have made your changes to the value field, click on update.
Congratulations! You have successfully made schema markup all by yourself without using any plugin in both Gutenberg and Old Classic editor. You might find it tedious and time consuming but before get tempted by plugins. You might want to know about the benefits of creating markup schema manually without plugins.
Pros of setting markup schema manually without plugins:
While it’s easier to use plugins for creating markup schema for your wordpress site.
There are numerous benefits that entails creating markup schema without using plugins. They are:
Customization: Manually creating a schema allows for greater customization of the database schema in any fashion you would want to. The inbuilt schemas have limited properties.
Hence, manually creating a schema gives you complete autonomy during their creation, according to your requirements.
You don’t have to worry about the restrictions imposed by plugins while manually creating schemas for your wordpress blogs.
Efficiency: Manually creating a schema can also be more efficient in terms of database performance.
This is because you can optimize the schema for your any use case, which can result in faster queries and less overhead.
Control: When you manually create a schema, you have complete control over the database structure. This means that you can make changes and updates as needed, without depending on a plugin to do it for you.
Understanding: Creating a schema manually can also help you to better understand how your database works.
This can be particularly useful if you are at the infancy of database development or if you want to have a clarity of how your application interacts with the database in the backend
Flexibility: Finally, manually creating a schema can be more flexible than using a plugin. This is because you can easily modify the schema to accommodate changing requirements, without having to worry about any plugin limitations.
Create schema markup using plugins.
If you find creating schema markup manually a cumbersome and lengthy process, you can always opt for plugins. Plugins like Yoast SEO, AIOSEO, Rank Math and so on can cater to your schema needs. They are the best schema markup plugin for wordpress.
- Navigate to Plugins >> Add New option. Search for the plugin of your choice. Then install and activate the plugin. We shall install Rank Math to add FAQ schema in our post.
- Navigate to the Posts >> All Posts and Edit the post where you want to add you FAQ schema
- Click on the ‘+‘ icon at the right of a block. Then select “Browse all“.


Voila!! You have created FAQ schema using RankMath plugin in less than a minute.
Conclusion
Schema markup is crucial factor of SEO that can improve the visibility and ranking of WordPress blogs in search results.
By providing additional context and information about your WP blog’s content to search engines, you can make it more attractive to users and increase the likelihood of it appearing prominently in search results.
If you’re not already using schema markup on your WP blog, what are you still waiting for?
8 thoughts on “How to Add Schema Markup for WordPress the Easy Way”