How To Easily Add Navigation Menu On WordPress Website?
Want to learn how to add navigation menu on WordPress website?. You’ve come to the right place. This article covers about the basics of adding or editing Menus in your website from the scratch. By the time you’re finished reading this article, you’ll be proficient to add/edit Menus in your site and also add extra functionality in your navigation bars.
A website navigation menu is a graphical user interface (GUI) element that allows users to navigate between different pages or sections of a website. Furthermore, It is typically located at the top, side or bottom of the website, and it consists of a list of links that correspond to different pages or sections of the site. When a user clicks on a link in the menu, they are taken to the corresponding page or section. This is an important section for any website for elevating the user’s experience.

In context of WordPress, you can add navigation menu in various sections of your website such as: Primary header, Footer section, sidebars. Furthermore, You can also add various type of Menu in WordPress such as: Horizontal Menu, Vertical menu, and Drop-down menu. Also, These types of navigation menu will greatly assist your website visitors. In addition, these functionalities will also help you score the higher user experience ratings and prosper in SERPs.
As we have discussed already, Navigation Menu is very useful for all the website. So, let’s see some of the major and visible uses of this feature in your website:
As the name suggests, Navigation menu’s primary function is to provide proper navigation to its users. Moreover, They allow website visitors to easily move between the different pages, categories, or custom links across the website. What’s more, This function greatly helps in improving user experience and making the website more accessible.
Content Organization
Menu’s vastly helps you in organizing your content in structured manner. And by creating custom menus, you can arrange pages, categories, and custom links in a meaningful order. So than it makes your users easier to find the information or multiple sections of the website.
Drop-down Menus
Drop-down Menus (also known as Nested Menus or Sub-menus) are very useful for organizing the hierarchy of the menu. Now, let’s say you have a particular page with multiple inner pages in your website that you want to put on the Navigation bar. What’s more Putting parent page and inner pages separately can diminish your user’s experience and content structures. But with the help of Nested menus, you can easily manage your menu in an orderly fashion.
Mobile Responsiveness
Mobile responsiveness is becoming an integral part for any type of website to function in Internet. As the usage of this portable device is gradually increasing, the demand for adjustment to its layout is also increasing substantially. Therefore, Navigation Menu on WordPress plays a crucial role in ensuring that your website is mobile friendly. WordPress Themes like: Saaya Blog, Azure etc. comes with responsive menu options that adapts to different screen sizes, making navigation easy on mobile devices.
Adding Navigation menu on WordPress is very easy. You can add menu from two different locations on WordPress. The first is from WordPress Dashboard and the second is from Theme customizer.
First, let’s look at how to add menu from WordPress Dashboard
- Foremost, go to your WordPress Dashboard by logging in with your credentials
- On the side-panel of the Dashboard, head towards Appearance and go to Menu from the pop-up menu.
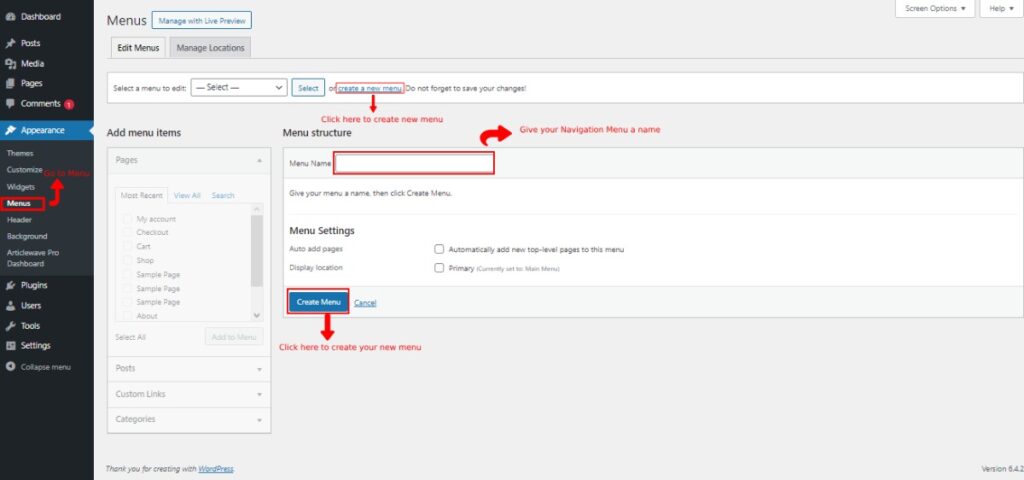
- Then, you’ll be redirected to the Menu section where you can add, edit, change locations or remove navigation menu on WordPress website.
- After that, click on the “create a new menu” text to create a new menu.
- Add your menu name in the text section, as highlighted in the image above.
- Check the options if you want to automatically add top-level pages in your new menu or use primary header as your menu location.
- Click on the “Create Menu” button to create your new menu.
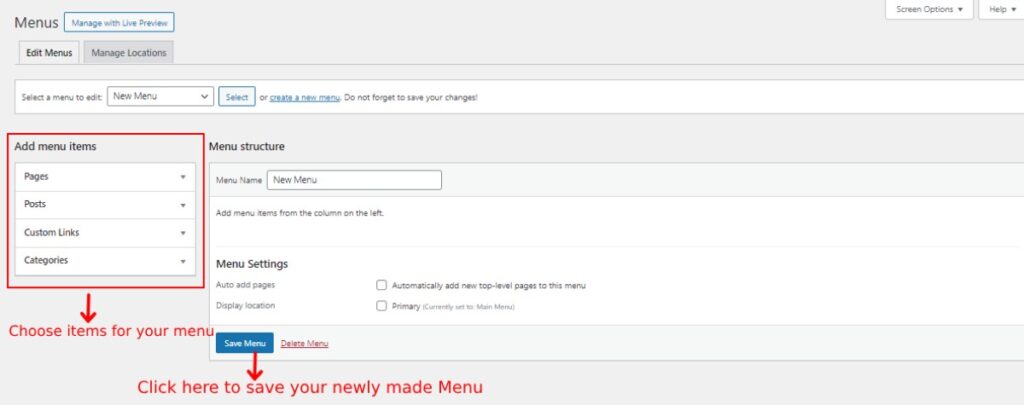
- There are four different items that you can add in your menu: Page, Posts, Custom Links, Categories
- Choose your desired items from the given options and click on the “Add to Menu” button to add your items.
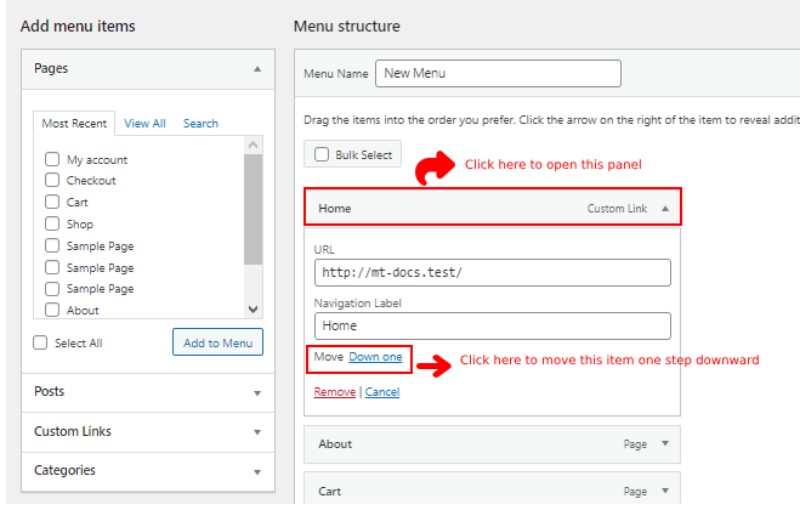
- After you’ve added your items in the menu, it’s the turn of the management of the items you just added in the navigation menu.
- If you want the top item to move one step down, click on that menu and click on “Move Down One” button in the bottom. You can move all the items up or down as per your preference.
Drop-down or nested menu are somewhat important feature that you can instill in your menu to make it more in-depth and enhancing its navigational feasibility. Furthermore, Nested Menus are required if you are planning to add the parent item like Pages and Categories and you want to nest their inner pages in the menu.
- After you have ordered your items in the navigation menu, it’s time to manage the drop-down items in your menu.
- Firstly, make sure that your parent item is in the top of the child item.
- After you’ve confirmed their order. Click on the child item or the item you want to nest under another item. Then select “Move Under <name of the parent item>”
This will add your create a drop-down menu, whose design will be depended upon the theme’s design.
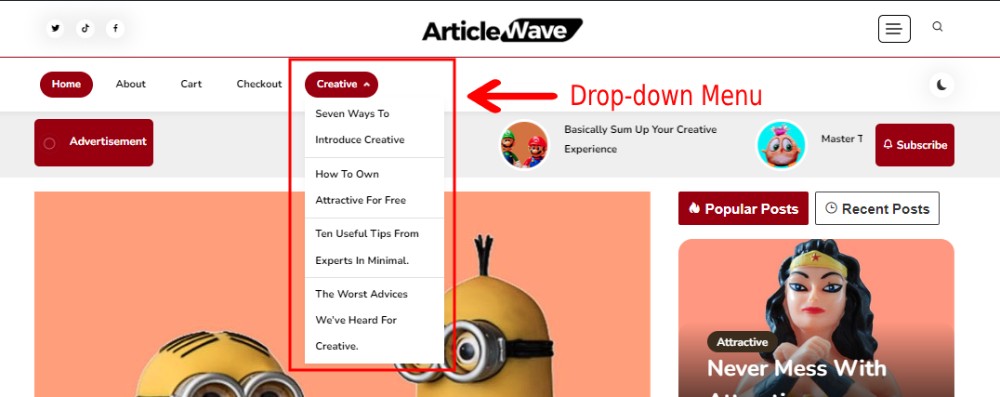
First and foremost, different themes may have different types of customizations available for configuration of the navigation menu on WordPress. But for this article, we will be using Articlewave theme to customize the menus and its items.

Articlewave
from Mystery Themes
Creating a navigation menu on WordPress is similar as in Dashboard. The only difference is you have changed the platform to do.
- Login to your WordPress Dashboard, then navigate yourself to Appearance >> Customize
- After that, head to Menu Settings from the customizer on the left side of the screen.
- Then Click on the Create Menu button below the navigation menu options
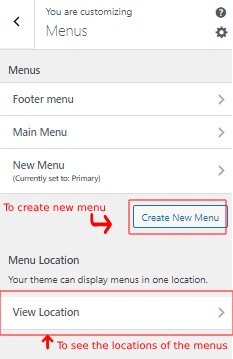
- After that you’ll be asked to name your new menu, click on the text area to name your Menu
- Follow up by clicking on the “Add Items” button to add your items in your new menu.
- Managing the orders of the item is similar to that of Dashboard. So, follow the same procedure to manage your items in navigation.
Disclaimer: Customizations maybe different with respect to the theme. To get the accurate guidelines, follow theme's official documentation.Adding the navigation menu on the sidebars maybe tricky job for some users. It is due to the fact that you cannot directly add Menu from the Menu Settings, rather, you’ll have to go to Widget Settings and add the navigation menu.
- Go to Widgets from Appearance panel on the left side of your screen
- Then you’ll be presented with different blocks where you can add your widgets
- After that, Click on your preferred sidebars and click on the “+” icon
- Then, search for “Navigation Menu” and click on the widget that appears to add it in the sidebar.
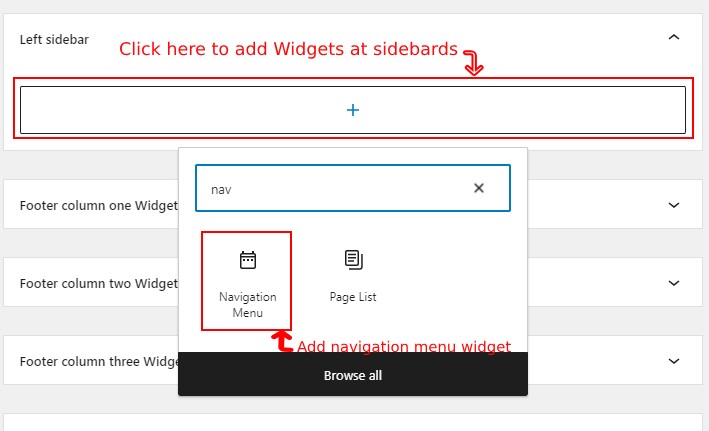
- Click on the widget after you’ve added it to select the Navigation menu you want to display in your WordPress website.
- After you’ve selected the menu, add the title to it and click on the “Update” button to save your changes.
At last, This process is somewhat similar to theme customization, too. Remember to add the “Navigation Menu” widget, give it a name, select the menu, and you are done.
Wrapping Up!
In conclusion, configuring the navigation menu on a WordPress website is a fundamental aspect of creating a user-friendly and intuitive browsing experience for visitors. By following the steps outlined in this guide, you can effectively organize and customize your website’s navigation menu to showcase your content and guide users to the most important sections of your site. Remember to consider your website’s structure, content hierarchy, and user preferences when configuring your navigation menu to ensure a seamless and engaging browsing experience for your audience.

One thought on “How To Easily Add Navigation Menu On WordPress Website?”